Currently Empty: $0.00
Innokin Adept: How to Guide
- Home
- Innokin Adept: How to Guide
In this photo tutorial, you will learn the basics of how to operate your Innokin Adept e-cig starter kit, including how to change the coil and fill the tank. We’ll also show you how to customize your vaping experience to suit your personal preferences with the click of a few buttons!
If you’re already up and running but you’re having trouble with your new kit, you may want to check out our Troubleshooting Guide instead.
If you’d rather watch a video, here’s a video tutorial that covers priming and changing the coil, filling the vape juice tank and replacing the glass tube. This video won’t cover more basic operation that is covered in this photo tutorial such as assembly, 3-click safety feature or charging the unit, nor does it contain the information on customizing your vaping experience or understanding variable wattage. For these topics, scroll down to the photo tutorials below.
Basic Operation
Assembly
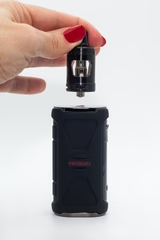
The Innokin Adept is made up of three components: the main body that holds the battery, the Zlide tank and the drip tip. Assembly is easy. Affix the drip tip to the top of the Zlide tank and screw the tank into the body of the battery.
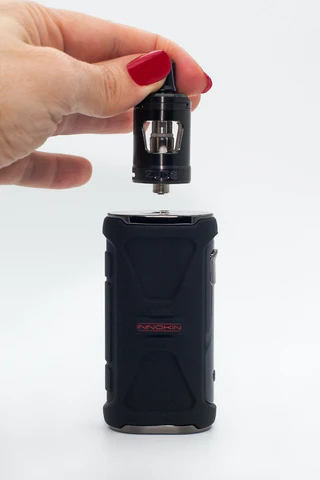
You’re good to go!
Turning the Unit On or Off
Like most e-cig models these days, the Innokin Adept comes with an on/off feature. This feature is designed to enable you to turn your e-cig completely off when you want to stow it in your purse, pocket or bag. This will prevent firing if the button is accidentally depressed when it is being stored which can be a safety hazard.
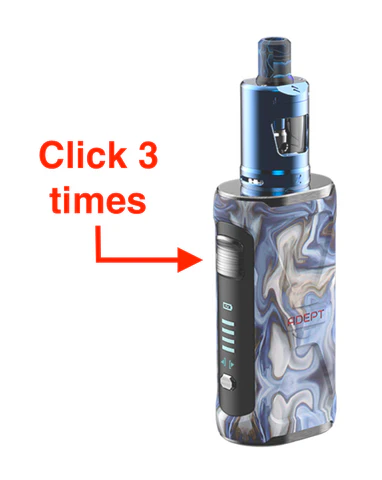
Most e-cigs come with a 5-click on/off feature, however, the Innokin Adept did something that seems like a small change but is actually very smart design. The Innokin Adept only requires 3-clicks to activate or deactivate it. Clicks must occur rapid fire and trying to get to 5 clicks in quick succession could sometimes get frustrating, especially for those of us with less manual dexterity.
The 3-click feature is frustration free and accomplishes what it needs to without frustrating the user. Why didn’t anyone think of this before?
Charging the Unit
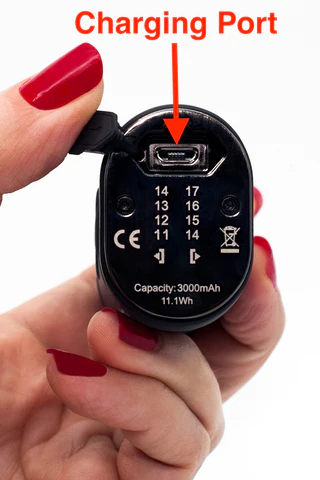
The Innokin Adept has a charging port located at the bottom of the unit. Gently dislodge the rubber stopper covering the port with your fingernail and plug the charging cord into the base.
In the course of their experimentation, chemists in the Marlboro lab discovered another surprising ability of ammonia. It could also be used to turbo charge the nicotine in tobacco by altering the form of nicotine naturally found in tobacco leaves, the salt form, and turning it into the freebase form of nicotine. This new, freebase form of nicotine was much more bioavailable and thus more readily absorbed by the user, giving a larger nicotine hit.
As the tobacco companies themselves put it:
“As the pH increases, the nicotine changes its chemical form so that it is more rapidly absorbed by the body and more quickly gives a ‘kick’ to the smoker.”
J. L. McKenzie, Product Characterization Definitions and Implications, 1976, 21 September (Minnesota Trial Exhibit 12,270)
This pH increase was achieved using ammonia. The FDA didn’t catch wind of the ammonia shenanigans until the early 1990’s. Needless to say, the FDA was not amused.
“It is our understanding that an experimental cigarette made of reconstituted tobacco treated with ammonia has almost double the nicotine transfer efficiency,” Dr. David A. Kessler, previous head of the FDA, told a Congressional hearing in 1994.
This freebase nicotine gave Marlboro an incredible competitive edge in the marketplace. So great was the advantage that freebase nicotine came to be called the “secret” or “soul” of Marlboro.
While Philip Morris has refused to admit that they were deliberately monkeying around with nicotine absorption rates in order to increase nicotine transfer and thus addiction, the outcome was the same. They were able to create cigarettes that delivered nicotine in a form that transferred to the body via the lungs both faster and more easily and also crossed the blood-brain barrier more readily, thus giving a greater nicotine hit. And the altered tobacco produced a smoother hit to boot.
All the other cigarette companies exploded in a frenzy of corporate espionage and reverse engineering trying to discover Marlboro’s “secret.” The secret was freebase nicotine.
The charging cord features a mini USB on one end and a standard USB on the other.
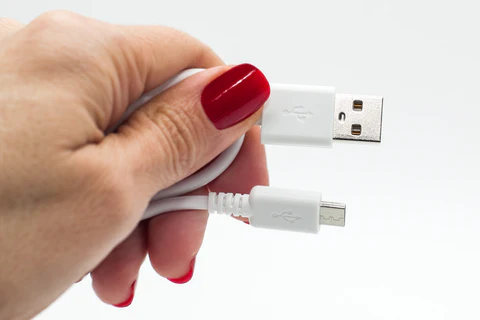
Plug the mini USB into the base of the Innokin Adept and plug the standard USB into a wall adapter (not included).
Despite the name, there’s no sodium taste to nic salt based e-liquids and vaping them won’t add sodium to your daily intake. The moniker is strictly a chemistry term. Just as “freebase” was used to differentiate the new, more bioavailable form of nicotine Marlboro invented, salt is so named simply because it’s created by combining an acid and a base.
Freebase nicotine has a high pH, meaning it is very alkaline. That’s why it burns your throat when you vape freebase nicotine at levels above 24 mg/mL. It’s not from the acidity but from the alkalinity. In fact, attempting to mask this harsh sensation is one of the reasons why cigarette companies came out with menthol cigarettes.
Nicotine salts, on the other hand, have a much lower pH meaning they are more acidic. The lower pH solves the problem of excessive throat hit caused by too much alkalinity. By adding an acid to freebase nicotine, usually in the form of benzoic acid, the alkalinity is effectively neutralized. The pH has been adjusted to more closely match the pH of your body and the harmony produces a smoother, less irritating throat hit.

Please note, Innokin does NOT recommend that you charge your Adept using a car charger. For best battery life, only plug into a wall outlet or other stable power source when charging.
Installing or Changing the Coil
Your Innokin Adept e-cig starter kit comes with two coils. A 0.48 ohm coil comes preinstalled in the Zlide tank. You can use that coil or you can swap it out for the 1.6 ohm coil that also comes with kit or you can opt for the 1.2 ohm coil we sell separately.
What’s the difference between the coils? The lower the coil rating, the hotter your e-cig will run while a higher coil rating will keep it running cooler. That means the 0.48 ohm coil will run the hottest with the 1.2 and then the 1.6 ohm getting progressively cooler.
For an explanation of the experiential difference between higher and lower ohm coils and how they affect flavor and other variables, see our post, What’s the Difference Between Ohms Ratings.
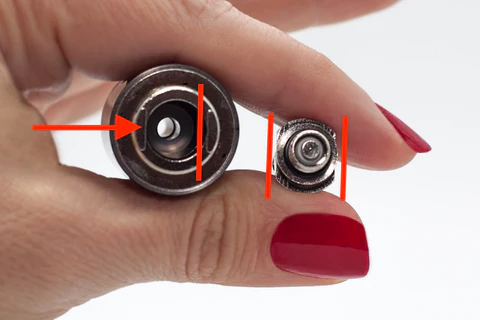
Removing a Preinstalled Coil
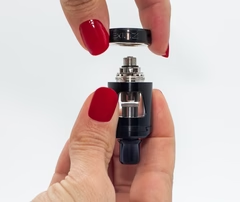
To replace the coil, first unscrew the tank from the body of the Innokin Adept.
Next, unscrew the ring from the base of the tank:
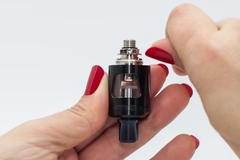
If there is a coil preinstalled that you need to remove, you can do so by lifting the coil with the edge of your finger or pulling up on the coil itself:
Priming the Coil
Before using any coil for the first time, first you must make sure you prime the coil. Priming the coil gets it saturated with vape juice so that, when you start vaping, the coil material isn’t dry.
If your coil material is dry, you will get what is known as a “dry hit.” You’ll know you got a dry hit because it tastes nasty, like singed fabric or burning rubber. Once you singe your coil, there’s no going back and you’ll have to toss it. For this reason, it’s important to always remember to prime the coil first!
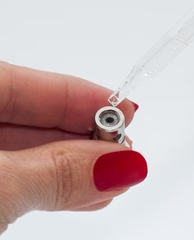
To prime the coil, turn it upside down and drip 3 to 4 drops of e-juice into the coil. This will wet down the wick and prevent a dry hit.

After you install the coil following the steps below, fill the tank with vape juice and then set the unit aside for 5 minutes to give the coil a little extra time to soak. We recommend this extra step when using the Innokin Adept to vape Kai’s Virgin Vapor e-juice. Because our natural and organic vape juices are manufactured using a 100% VG base, the viscosity is slightly higher than PG based vape juice. For this reason, giving the coil an extra 5 minute bath in the tank is a must to give the e-liquid time to fully soak into the coil.
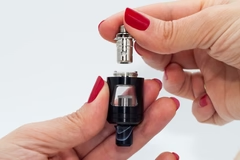
Installing the Coil Correctly
Now, unscrew the tank from the body of your Adept and turn it over so you can see the bottom. You’ll notice that the top of the coil and the bottom of the Zlide tank both have flat edges on two sides.
You want to make sure you line the flat edges up so the coil drops into place with the flat edges of the coil aligned with the flat edges of the tank. If you don’t line these up, you’ll end up with a slow vape juice leak that can get very messy!
Drop the coil into the tank and rotate it until it clicks into the slot between the flat edges:
After you’ve installed the coil, fill the vape juice tank and set the unit aside for 5 minutes just to be sure the coil is nice and soaked with vape juice before you start vaping.
Filling the Vape Juice Tank
Filling the tank involves three quick motions:
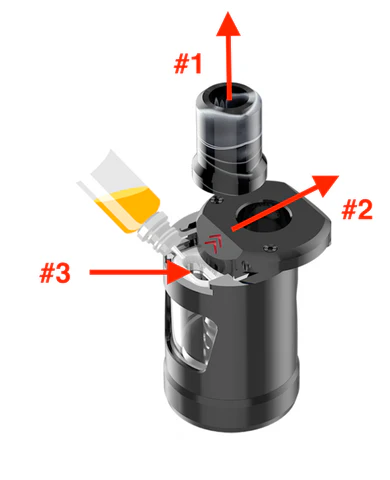
#1 First, remove the drip tip. The drip tip is designed to hold the tank closed to prevent children from accessing the vape juice and also to keep the tank from accidentally opening in your purse or pocket. Just pull up on the drip tip and it will pop out.
#2 Second, to open the tank, press the top forward to reveal the filling port underneath. The flattened surface with two red arrows is a good place to push forward with your thumb.
#3 Third, fill the tank with vape juice through the filling port.
Customizing Your Vaping Experience
Adjusting Airflow
The Innokin Adept allows you to adjust the airflow, creating either a more airy vape with an easier draw or a tighter vape that requires more draw to pull the air through.
Airflow preference is highly personal and often evolves or changes over an individual’s vaping life. Airflow preference is often influenced by how recently the vaper was used to smoking cigarettes which accustoms the users to a particular style of inhaling.
Fortunately, the Innokin Adept allows you to adjust the airflow to your preference. Simply spin the ring at the base of the tank:
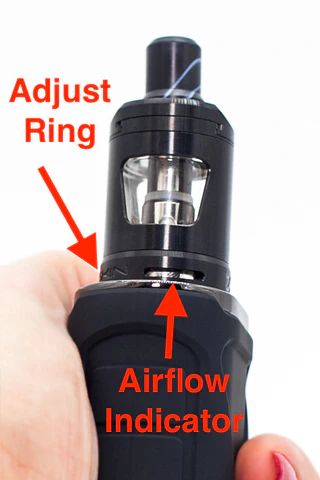
The airflow indicator area will show an increasing number of small holes as you turn the ring. The greater the number of holes, the more air is flowing through the unit.
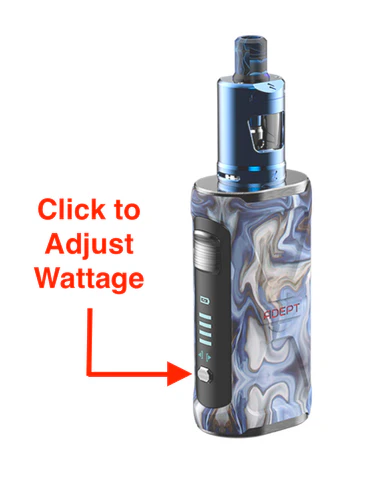
Adjusting Wattage, Vapor Temperature & Flavor
Wattage determines how hot your e-cig is running and the amount of heat will in turn influence the temperature of the vapor as well as the flavor.
Flavor is highly individual to each vape juice flavor and to each individual vaper’s taste preference so there is no perfect heat setting for every flavor. Instead, each flavor has its own sweet spot and that is why having an e-cig that allows you to adjust the wattage makes for such an improved vaping experience.
Some flavors will become bigger and bolder at higher voltage whereas some flavors will disappear completely with too much heat. You’ll have to experiment to find the perfect setting for each flavor that best suits your personal taste preferences.
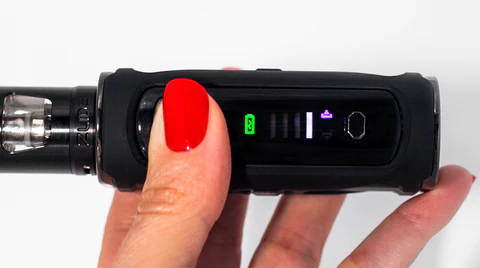
To adjust the wattage, just click the wattage button.
In the picture above, you’ll see four bars in the digital readout above the wattage button which represents the maximum wattage for the coil you have installed. Clicking the wattage button, you can go all the way down to one bar which represents the lowest wattage setting:
Wattage Ranges
There’s no need to understand wattage ranges and you can skip this section entirely if you’d prefer to keep it simple. However, if you want to know a little more about wattage, turn your Innokin Adept upside down and look at the bottom of the base:
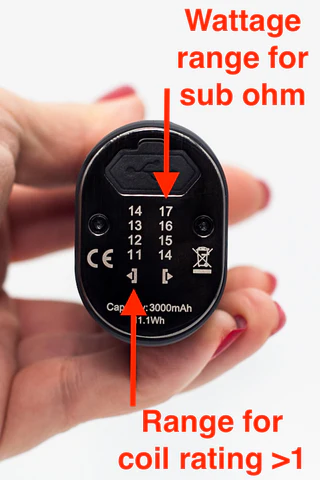
When you install a coil, the Innokin Adept will automatically detect the ohms rating of the coil. If the ohms are above 1.0, the unit will automatically limit the wattage range to the column on the left. If the coil rating is below 1.0, which is known as “sub-ohm vaping,” the unit will automatically select the wattage range shown on the right. The wattage range limits are set to ensure the e-cig always operates in a safe range and to prevent excessive heat causing issues like a dry hit.
You’ll notice that each column contains four numbers. Those four numbers correspond to the wattage setting the unit will be operating at when each of the four bars on the digital display are illuminated:
So, for example, if you install a coil with a 1.2 or 1.6 ohms rating, when the display shows two bars, you’ll know you are vaping at 12 watts.
Playing with Coils
Along with wattage, you can also experiment with different coils to find the combination that best suits your personal taste preferences and makes your favorite Kai’s Virgin Vapor vape juice flavor shine the brightest!
We find that our flavors are best suited to the the 1.6 ohm coil included in the starter kit or the 1.2 ohm coil that we sell separately. The 0.48 ohm coil that comes preinstalled in the tank with the Innokin Adept starter kit tends to run too hot for our 100% VG base and our more delicate natural and organic flavors.
When playing with coils, just remember that the lower the ohm rating of the coil, the hotter your e-cig with run whereas a higher ohm rating will create a slightly cooler vape experience. For more details on how coil ratings affect vaping, check out our blog post.
If you’re running into issues with your new Innokin Adept e-cig starter kit, you may want to check out our Troubleshooting Guide as there are a few quick fixes that eliminate nearly all issues with this model. In addition, as always, we’re just a phone call away if you need help. Call (844) 303-4545 or you can email us at: customers@kaisvirginvapor.com
Happy vaping!